FMP Week 27 - March 30th
Rigging & Animations
William Marshall
Intro
With all of my Mechs fully modelled and textured, this point in the project revolves around animation and rigging, which allows the Mechs to be brought to life via movements.
Ranger Improvements & Changes
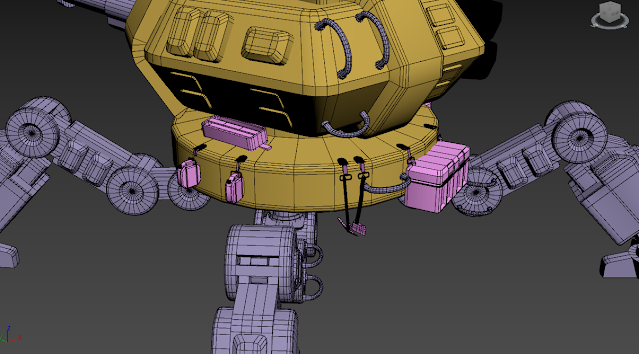
I received some feedback from my project supervisor, who recommended that I attach things like crates, bags, tools, parts & equipment to the hull of the Ranger, to make it seem more versatile and act similarly to a modern tank, which is also responsible for carrying large loads of equipment.
Following these ideas, I attached fuel canisters, road-clearing tools (pickaxe, fireaxe) and two large crates to the hull, which were all supported by hooks that were bolted directly to the lower half of the Ranger, meaning that they could swing around freely, but would not detach unless carefully removed by the pilot/crew.
After I attached these objects, I also placed special bones on the rig that would enable me to manipulate each tool, to show that they would swing around during certain animations, rather than remaining rigid.
Rigging & Skinning
Ranger
Rigging the Ranger used a standard 3dsMax CAT Rig, just with a increased number of legs. I started off with the 'hub' in the very middle, which dictated the movement of the lower body, as well as being the point that all the other bones would come out of. The upper body was placed on top, which controlled the turret rotation.
For the legs, I created one of the legs (the front left) by using three leg bones, a foot and a foot controller (for animation purposes). This was then duplicated around the central point, which created the 4 identical leg bones that would allow my Ranger to move properly.
Finally, as I mentioned above - the special bones for the tools were placed near the central point. I ensured that all of these bones had correct rotations/positioning before finalising the rig, as I would encounter difficulties with animation otherwise.
Similarly, rigging the Haytham used a CAT Rig that followed a much more humanoid structure, having two arms and two legs. The main hub for this Rig was the hips, as the legs, upper torso and arms could all flow from this central point.
Same as before, I created one of the legs before duplicating it, which would mean that the legs were symmetrical and would perform well during animation. This process of duplication was also used for the arms, although the lengths varied due to the weapons being different on each arm.
For more specialized bones, I added a bone for the frontal hatch, missile launcher and minigun, as these could all be rotated and moved during my planned animation process.
Skinning was quite simple for these models, as all of these were hard-surface objects. This meant that there was no deformation of the mesh during the animations, meaning that I could skin by assigning 100% of the intended piece to a single bone. For example, I was able to assign 100% of the turret pieces (such as the main barrel, armour boxes, antenna, etc) to the upper body bone, which would then rotate on a 360 axis when that bone was rotated.
This process was completed across both models without taking too much time!
Animations
Ranger
The Ranger had five planned animations, which were as follows:
Shooting (Firing the main gun, strong recoil due to the force of the shot)
Walking (Mechanical walk similar to a spider, the front and rear legs will move in diagonal unison)
Idle (The main turret will casually look in different directions, as if scouting)
Alert (The crew spotted something and attempt to angle the Ranger to get a better look, using the strong legs to push the chassis upwards)
Dropping (Simulating the Ranger being dropped from orbit directly onto the battlefield)
Haytham
The Haytham's animations were similar to the Rangers, but with a few differences:
Minigun Shooting (The Haytham roots itself into the ground, before firing a short burst from the Minigun after it spins up)
Flak Gun Shooting (The Haytham roots itself, before firing two strong shots from the Flak Gun, producing some strong recoil)
Walking (Due to being a Skirmish vehicle, the Haytham has a quicker and more agile walk than the Ranger)
Orbital Drop (Simulating the Haytham being dropped from orbit, the legs absorb the impact)
Embarking (The Haytham powers down, sinking to a fixed position closer to the ground, the main hatch will swing open to allow the pilot to enter easily.)
For each Mech, each of the animations were completed on a single timeline, leaving 10 frames or so between each animation so that the starting positions could be updated. The reason for this is Unity, as importing the animations is much easier if they share a single timeline, as the timeline can simply be sliced up into 5 different animations, as long as I keep track of when each animation starts and ends.
Next Blog Post - 13th April
For my next blog post, I will be working on these topics:
- Presentation Improvements
- Further Animations & Refinement
- Final Presentation Planning


No comments:
Post a Comment