Tuesday, March 30, 2021

FMP Week 27 - March 30th - Rigging & Animations

  FMP Week 27 - March 30th

Rigging & Animations

William Marshall 


Intro

With all of my Mechs fully modelled and textured, this point in the project revolves around animation and rigging, which allows the Mechs to be brought to life via movements.

Ranger Improvements & Changes


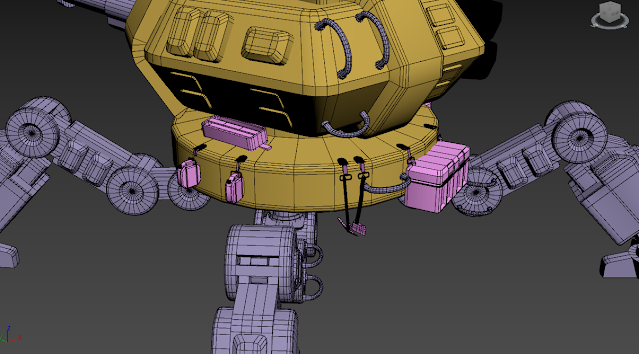
I received some feedback from my project supervisor, who recommended that I attach things like crates, bags, tools, parts & equipment to the hull of the Ranger, to make it seem more versatile and act similarly to a modern tank, which is also responsible for carrying large loads of equipment.

Following these ideas, I attached fuel canisters, road-clearing tools (pickaxe, fireaxe) and two large crates to the hull, which were all supported by hooks that were bolted directly to the lower half of the Ranger, meaning that they could swing around freely, but would not detach unless carefully removed by the pilot/crew.

After I attached these objects, I also placed special bones on the rig that would enable me to manipulate each tool, to show that they would swing around during certain animations, rather than remaining rigid.

Rigging & Skinning

Ranger

Rigging the Ranger used a standard 3dsMax CAT Rig, just with a increased number of legs. I started off with the 'hub' in the very middle, which dictated the movement of the lower body, as well as being the point that all the other bones would come out of. The upper body was placed on top, which controlled the turret rotation.

For the legs, I created one of the legs (the front left) by using three leg bones, a foot and a foot controller (for animation purposes). This was then duplicated around the central point, which created the 4 identical leg bones that would allow my Ranger to move properly.

Finally, as I mentioned above - the special bones for the tools were placed near the central point. I ensured that all of these bones had correct rotations/positioning before finalising the rig, as I would encounter difficulties with animation otherwise.


Similarly, rigging the Haytham used a CAT Rig that followed a much more humanoid structure, having two arms and two legs. The main hub for this Rig was the hips, as the legs, upper torso and arms could all flow from this central point.

Same as before, I created one of the legs before duplicating it, which would mean that the legs were symmetrical and would perform well during animation. This process of duplication was also used for the arms, although the lengths varied due to the weapons being different on each arm.

For more specialized bones, I added a bone for the frontal hatch, missile launcher and minigun, as these could all be rotated and moved during my planned animation process.


Skinning was quite simple for these models, as all of these were hard-surface objects. This meant that there was no deformation of the mesh during the animations, meaning that I could skin by assigning 100% of the intended piece to a single bone. For example, I was able to assign 100% of the turret pieces (such as the main barrel, armour boxes, antenna, etc) to the upper body bone, which would then rotate on a 360 axis when that bone was rotated.

This process was completed across both models without taking too much time!

Animations

Ranger


The Ranger had five planned animations, which were as follows:

Shooting (Firing the main gun, strong recoil due to the force of the shot)
Walking (Mechanical walk similar to a spider, the front and rear legs will move in diagonal unison)
Idle (The main turret will casually look in different directions, as if scouting)
Alert (The crew spotted something and attempt to angle the Ranger to get a better look, using the strong legs to push the chassis upwards)
Dropping (Simulating the Ranger being dropped from orbit directly onto the battlefield)

Haytham


The Haytham's animations were similar to the Rangers, but with a few differences:

Minigun Shooting (The Haytham roots itself into the ground, before firing a short burst from the Minigun after it spins up)
Flak Gun Shooting (The Haytham roots itself, before firing two strong shots from the Flak Gun, producing some strong recoil)
Walking (Due to being a Skirmish vehicle, the Haytham has a quicker and more agile walk than the Ranger)
Orbital Drop (Simulating the Haytham being dropped from orbit, the legs absorb the impact)
Embarking (The Haytham powers down, sinking to a fixed position closer to the ground, the main hatch will swing open to allow the pilot to enter easily.)

For each Mech, each of the animations were completed on a single timeline, leaving 10 frames or so between each animation so that the starting positions could be updated. The reason for this is Unity, as importing the animations is much easier if they share a single timeline, as the timeline can simply be sliced up into 5 different animations, as long as I keep track of when each animation starts and ends.

Next Blog Post - 13th April

For my next blog post, I will be working on these topics:
  • Presentation Improvements
  • Further Animations & Refinement
  • Final Presentation Planning


Tuesday, March 16, 2021

FMP Week 25 - March 16th - The Ranger & Haytham

  FMP Week 25 - March 16th

Ranger Creation (Mech #3) & Haytham Texturing

William Marshall


Blog
Now that I'm nearing the end of this project, I've been pushing to get all of my Mechs textured and modelled, ready for animation & feedback. My Third Mech is called the Ranger, which has a different role compared to the Haytham and Rotary, being a long-range variant that is heavily inspired by modern tanks and sci-fi drones. 

The intended role for the Ranger is a long-range artillery piece designed to penetrate enemy armour, much like the role of a modern tank. Additionally, the spider-like construction also allows the Ranger to scale difficult terrain and 'cling' to a larger variety of surfaces, making it more maneuverable than a tread/tire-based vehicle.

Ranger Design
My Design:

Early on in September 2020, I created these 4-legged designs to add some variation to the rest of my silhouettes. When I was considering which Mech to create for my 3rd slot, I decided to incorporate these 4-legged concepts so that the 3rd was more unique and varied. Originally named the 'Scorpius', I decided to incorporate elements from Drillwyrm, E-77 Reaver and Knifedge. The most unique trait was going to be the Scorpion tail from the Drillwyrm, which would be able to fire in a 180-degree arc around the front of the vehicle, most likely some sort of anti-infantry weapon due to the flexibility.

Milanote References:

Star Wars - Spider Droid

Ghost in the Shell - Spider Tank


Modelling
Modelling the Ranger combined elements from the Rotary and Haytham, as it combined both boxy and cylindrical shape design. The main turret/body was constructed by using various tank references, taking into account the slim & curved profile to deflect enemy projectiles. Once the main body was constructed, I was able to create the legs by using a four-boned structure to ensure stability and ease of movement, before using the symmetry tool to place them at 90-degree angles around the lower body so that everything looked symmetrical.

One of my early concepts had a cockpit with two pilot positions, as the first seat would have been for movement and primary controls, with the second seat controlling the weapons on the front and tail. However, when I scrapped the idea of the scorpion tail, it didn't seem necessary to have the two seats, so I converted it into the tank-on-legs concept that you see now.

The entirety of the model was made within 2-3 days, due to the tank construction being the main 'body' of the piece and the legs being duplicated around the mesh. 

Unwrapping


Due to the Ranger having fewer pieces than the Rotary and Haytham, I was able to condense the model into two texture sets, rather than the three I had for the previous two Mechs. If any upgrades or additional pieces were added to the mesh, I'd be able to incorporate those into a third texture set if necessary. 

Any pieces relating to the legs were overlayed on top of each other in the map, increasing the overall resolution, as four copies were effectively combined into one. This also happened for any instances/copied objects, in order to maximize the visual quality. 

Ranger Texturing

When it came to texturing the Ranger, I decided to incorporate ideas from both the Rotary (Camo & Metal) and Haytham (Armour boxes, Curvature, Unique Markings) to get the best of both worlds. I painted the outer layers of the Ranger with camouflage appropriate to certain environments, such as snow and desert. The inner layers were given a standard grey metallic appearance, to ensure that there was a clear 'Primary' and 'Secondary' colour in the scene. The third colour was applied to the armoured boxes on the exterior of the body (to absorb impacts and act as composite armour). 

I also made heavy usage of paintable layers and hard-surface normals to achieve the illusion of greater detail in the mesh. This included things like painted decals, insignia, arrows, hatches and switches. Without them, the Mesh would look a lot more basic and far less interesting.

Haytham Texturing

Last week, I presented the Haytham and some basic texturing for it. Afterwards, I went on to create several variations (much like the Rotary) that would be used in different situations. For instance,

Brown/Black - Stealth Missions, 'Vintage' look, Low-Key
Green/White - Biohazard, Radioactive, Sports
Original Green/Orange - Factory New, Urban Combat
White/Blue - Snow, Blizzards, Storms, High-Altitude

Creating these variations and thinking of their intended purpose gave a greater context to each of the textures, which I enjoyed doing. 

Engine Work & Transitions

Once I had combined all of the varied models and materials and set them up in my engine (using the mockups and inspirations I had created previously), I've been able to showcase the current state of my project more effectively, as I now have some interactivity in my scene, as well as a unique transition which helps everything flow better and feel smoother. These transitions were set up by animations which had a 'Fade In' and 'Fade Out' trigger dependant on whether the scene was being loaded or opened for the first time. The buttons themselves simply changed the scene over with a delay of 1 second to demonstrate the transition working, using simple C# code. 

Next Blog Post - 30th March

By the time of my next blog post, I will be working on these:

  • Ranger Improvements
  • Mech Rigging
  • First Animations


Tuesday, March 2, 2021

FMP Week 23 - March 2nd - The Haytham

                               FMP Week 23 - February 16th

Haytham Creation (Mech #2)

William Marshall


Intro

These last two weeks have seen the work on my second mech come to completion. This Mech is named the Haytham, which has a different battlefield role compared to the Rotary. 

The Haytham is designed to be an agile brawler which is capable of outputting major damage with the hull-mounted minigun, flak cannon and missile launcher. In order to make it agile, it has had to sacrifice heavier armour to decrease the weight, making strong use of composite armour & sturdy construction to take hits instead.

I learnt a lot from the creation of the Rotary beforehand, as the Haytham was the second Mech I've ever created, such as:

  • Normal Details in Substance, saves tris
  • Curved/Circular Geometry helps with the high-tech look
  • Unique Weapons & Usage
  • Pleasing Colour Palettes
  • Better Lighting Techniques
  • Marmoset Usage

Haytham Design

As I created the Haytham, I took inspiration from several sources:

AMP Mech Suit:


BT-7274:

Milanote Research:

Blueprint:

As previously mentioned, the Haytham is designed to be a brawler and damage-dealing platform. However, it is not designed for endurance or drawn-out conflicts, meaning that it sacrifices heavy armouring and sheer size compared to other models. 

Modelling:

Modelling the Haytham involved a lot of freeform modelling and iteration, as I was attempting to incorporate the feedback that had been received with my first mech. I ensured that I was adding more curved geometry, mechanical joints, unique weapons, connectors (bolts), unique details whilst maintaining a sturdy frame that was true to my original design.

Originally, I had wanted the pilot hatch of the Haytham to open upwards like a modern fighter jet, similar to Titanfall 2's pilot hatch openings. However, when I looked at the AMP Platform, I preferred the look of a forward-facing hatch that opened outwards, meaning that the Pilot could climb into the cockpit by scaling the Mech's legs (also aided by handlebars which I placed at key points, much like rock climbing!)

In the animation, you can see several design changes. On the right arm, I originally intended for a grenade launcher to be added, to aid with the destructive potential. However, the stocky design did not fit well compared to the minigun, so I looked elsewhere for destructive inspiration, finding this:


This is a Flechette Launcher from Star Wars: Jedi Academy. It acts as a thermal shotgun, spraying out hot shards of shrapnel. Since it was quite a stocky, intimidating design with some curvature, I decided to incorporate it into the right arm and extended the length, so that it looked uniform with the Minigun on the other arm, adding my own spin onto the design by reinforcing the frame with additional geometry, adding circular connectors and an ammunition hose at the back to be reloaded without needing a physical magazine. 


Unwrapping:

Just like with the Rotary, I split the Haytham up into three different texture sets, to maintain good visual quality. 


Each part was separated into the Legs, Body & Weapons. Where it was possible, I also incorporated symmetry in order to mirror similar pieces of the mesh and save UV space. This occured on the left side of the arms, legs and chassis. However, the downside was that it was difficult to add custom/unique graphics, as it would be directly flipped onto the other side unless I manually separated the overlapping UVs.

Unity Project

Using my mockup from the last blogpost, I was able to create a 'basic' version of my concept inside Unity. However, this is very rough and has few attractive elements, more focused on the functionality of the buttons and arrows. In order to select the different Mechs and Camoflauge, I aim to use a script which simply hides/unhides a particular prefab when the arrow is selected, meaning that I can cycle through my various meshes properly.

From this point, I will be focusing on creating the other Mechs and Camoflauge textures before more work is completed in the engine. However, improvements will include custom UI buttons, an animated background, sculpted/textured bases for each Mech and some ambient sounds for atmosphere.

Next Blog Post - 16th March

In my next blog post, I will be demonstrating:

  • Textured & Rendered Haytham Mech
  • 3rd Mech Creation & Modelling
  • 3rd Presentation


FMP Week 32 - May 15th - Final Unity Build, Animations, Portfolio Setup and Reflection

      FMP Week 32 - May 15th Final Presentation, Final Unity Build & Animations, Project Reflection William Marshall   Intro The project...